Saturday, April 30, 2011

This is a great story


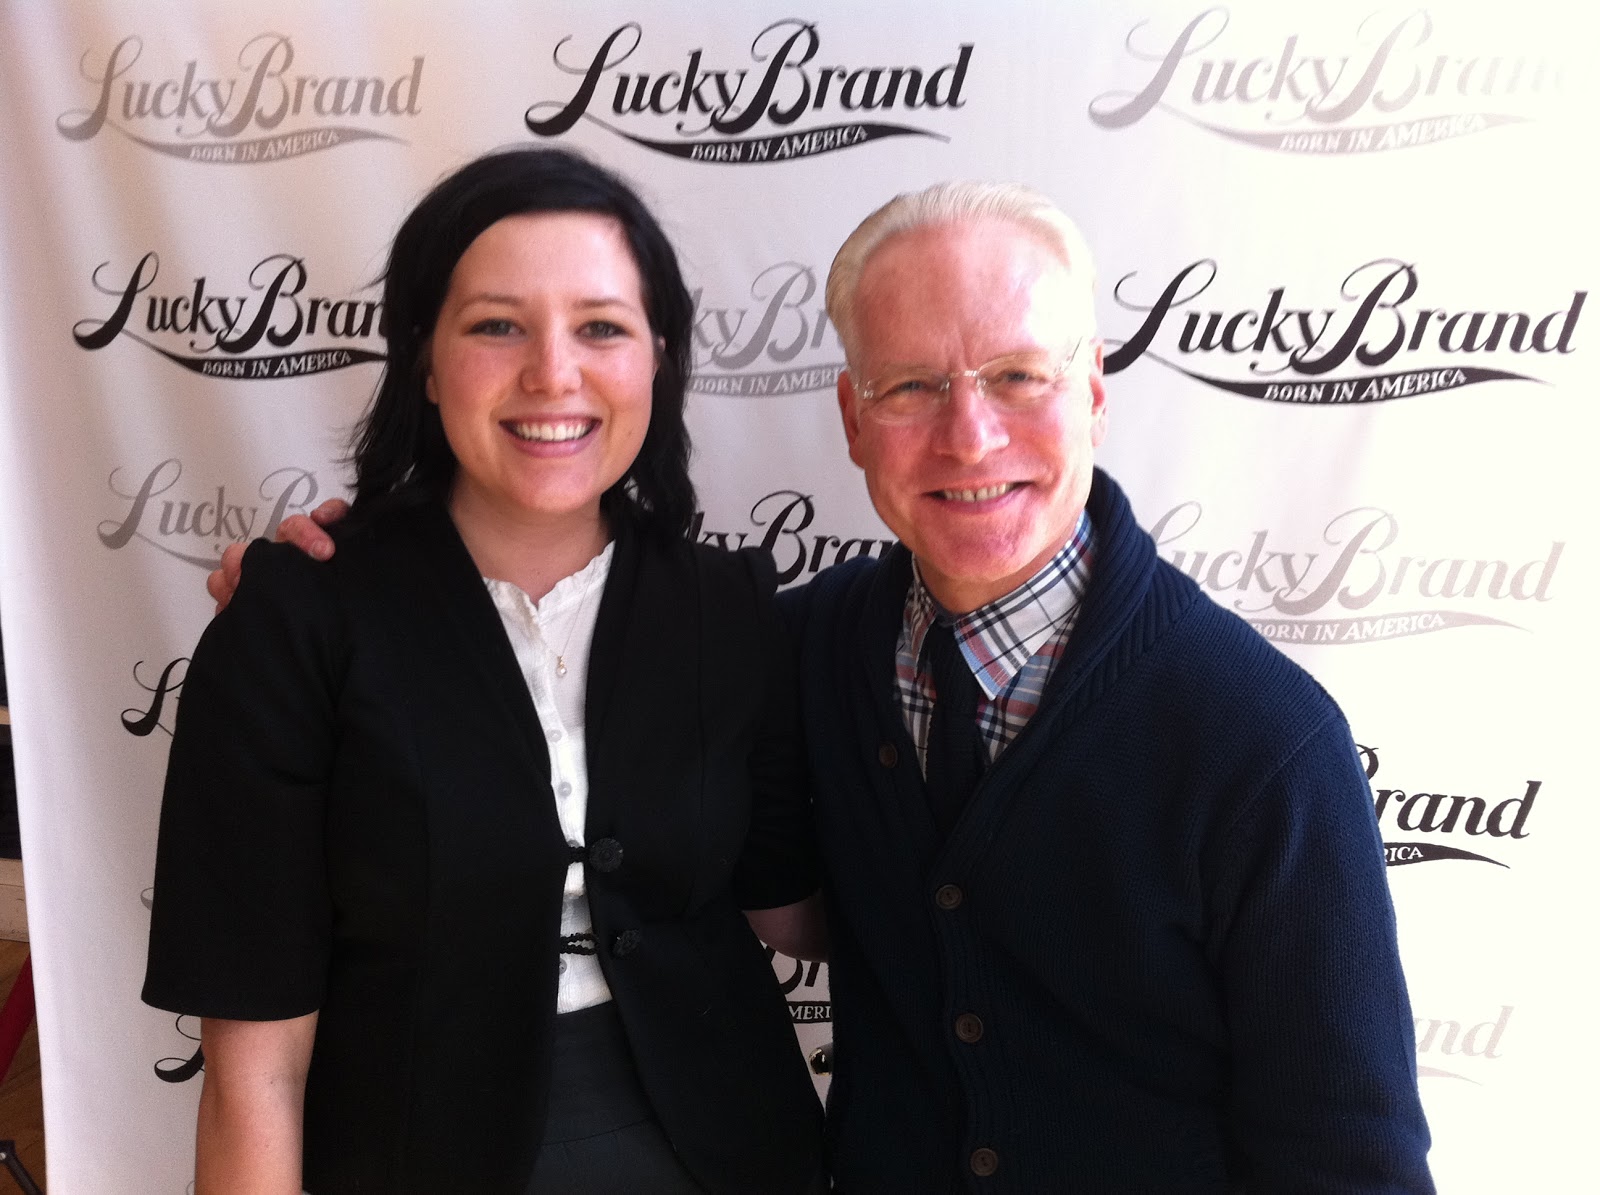
Yes. That is me with TIM GUNN oozing my way into his affections! You're eyes aren't failing you! I'm also wearing my "suit" that I made: pencil skirt, poofy blouse, and ponte knit black blazer to show off my skills at this preliminary audition for Project Runway-- that's how I thought of it at least. 

More on that later. Let's start at the beginning. 

About two months ago Steve and I saw signs in the Gateway Mall parking structure that Tim Gunn was going to be at the Lucky Store, April 30th. SO excited. I knew I had to go, which is actually the whole reason I made this suit in the first place (I never mentioned that in order to build the surprise!) Then I got my new full time job as a pattern maker, and low and behold the first Saturday that I have at my new job I have to work-- that day being today. I was so worried I wouldn't be able to get home in time to change into my suit to meet Tim Gunn. And I wasn't about the to just wear any old thing that I didn't make. Totally pointless. I knew I had to "make it work". 

With the help of the heavens, I was on my way home at 2:20 pm this afternoon. Tim Gunn started signing his new book at 1 pm-- did I even have a chance? I called The Lucky Store to see how much longer he had, and the nice girl on the phone mumbled "no idea". Great. Steve and I took our chances as I quickly pulled my blouse out of the dirty clothes basket, gave it a quick ironing, and bolted out the door with sketchbook in hand for Tim to sign. Steve dropped me off right in front of the store where there was a big line still forming, so I knew I would get my chance! Tim was still there and I was inside the red ropes! 

As I waited in line totally anxious, I saw that everyone had a Lucky shopping bag. I asked the lady in front of me:

"Do we have to buy something to meet Tim?"

"Yes. You have to spend $100 in the store before you meet him."

"ONE HUNDRED DOLLARS?"

"Yes, I debated with my teenage daughter for two hours if we really wanted to do this, but we said 'why not?'"

She looked at my sketchbook.

"You brought your drawings for him to see, didn't you?"

Sheepishly.."yes.."

"You go in there and spend that $100 dollars. It will be worth it."

Now, Lucky Brand Jeans is a great store and I have nothing against them, but the hippy-dippy flopsy-mopsy look has never worked for me or my taste, so I grabbed the first pair of men's jeans that I saw ($140) and bought them for Steve. 

I plan on returning them. tee hee. 

I got back in line, where Steve met me. He checked my teeth for junk and my breath. It was my turn, I shook Tim's hand, and the first thing I said to him was, "I made my WHOLE OUTFIT!" like a big dork. The great thing about Tim Gunn is that he is truly sincere and at least pretends to be interested in everything you are saying. He looks you in the eyes with those big blues of his and you feel like best friends. He asked me to turn around for him, and he said that the construction on my jacket was "wonderful" and he loved the roses on my skirt and how they were isolated in the corner, not too much but "just enough". I told him I just got a job as a pattern maker for a bridal company in Salt Lake. Then I ordered the girl who was working the line to take candids of me and Tim. I felt on top of the world after he gave me my copy of the book he had just signed and said:

"I am very impressed with you."

I felt amazing! Truly amazing! He took a picture with me and then asked if Steve wanted to get in the next one, and then I said, "no. just me", but Steve got in anyway just to bug me. I didn't want his horrid rain jacket to ruin the photo. I was trying to impress Tim Gunn for crying out loud.  I completely forgot to mention my sketchbook though. I was just holding it like a weirdo the entire time. Oh well. He was only allowed to sign the books anyway.

Such a wonderful day. I then bought a sweater at Ann Taylor Loft for 40% off just to top my sundae with a cherry. 


Tuesday, April 26, 2011

I'm a little exhausted.

I started my first full-time job yesterday, and I am exhausted but totally excited for tomorrow. I feel like a legit seamstress at my work, and as a legit seamstress, I need a great black blazer. 

A black blazer made out of black ponte knit, my most favorite fabric. Doesn't it look great? I used the pattern from my first blazer, but took in the side seams a bit to account for stretch in the fabric. 

I'm making a weirdo face because Steve was making me laugh. But I did have a great hair day for my first day at work! This isn't the exact outfit I wore to work because when I got home I threw on my pajamas and turned on TLC's Royal Wedding Week special-- I suppose this is what happens with a full time job.

Monday, April 25, 2011

It had to be done.

I was sewing all weekend. i woke up on Saturday morning full of energy and ready to continue the work I had started the night before-- work on yet another PD. I know, I know. 

"Another PD, Ellen?" 

It just had to be done.

I actually had cut out an A-line shift to be made out of this great maroon ponte knit, but when I tried it on after I had serged it all up, it just wasn't working for me. So I decided to do another PD (my 4th) just so I could have another more causal one to wear shopping, on a date, or to....work. 

That's right. I got a full time job as a pattern maker at an internationally known wedding dress company based in Salt Lake-- a total dream! The job is temporary (they only need me for about a month), but I'm going to work my butt off to try and get a position as a Design Assistant. I'll still be blogging and sewing on my own for sure (I'll need more work clothes!) and I'm still gong to try to do every week day like I have been doing...or trying to do :D

I also figured out what to do with underlining knits in order to bead-- simple fusible or sew-in tricot knit interfacing is the best (go figure- I don't know why I thought I could figure it out differently). I also used a facing for the yoke I made as well, and then I hand-beaded the flower detail to the black yoke. At least I did something different with this PD, and I love it.


And yes, I cut my hair. We are full of changes today. 

Tomorrow I'll be showing yet another work piece that I made this weekend. It was a busy two days.

Wednesday, April 20, 2011

Still no luck

I think the problem is the organza. Even though it is cut on bias, it still won't stretch like the knit does. I think I'm going to have to underline with a Tricot knit (which is typically used to line and underline knits), and then also have a facing for the yoke detail to hold up the beading. I got rid of the back yoke all together, so I'll just have beading on the front of the shirt. Yay for experimenting!

Tuesday, April 19, 2011

I could sing it from the rooftops... I HAVE 100 FOLLOWERS!

Celebrations aside, I have to get back to work. But it is fun work! 

Yesterday I started working on a new knit shirt that would have beaded embellishments on the neckline. I really wanted to experiment a lot with this project to learn new techniques and decipher which ones are the best, what works and what doesn't.

Since I knew the neckline would be beaded eventually, and that I would be embellishing on a knit, the neckline would have to be interfaced or underlined with something to hold up the weight of the beading. I thought I'd experiment with the underlining by using organza cut on the bias. 


I basted the organza to my knit (not perfeclty, but clsoe enough) and then sewed the shirt together like it was all one piece. 


I don't know if I like it though... The organza underlining is fine, but I don't like how it is put together. I think I'll start over on it today with a new technique. What I sometimes hate about "home-made" projects is that they don't look pretty on the inside, and I want that level of professionalism. This does NOT look so good on the inside, so back to the drawing board!

Friday, April 15, 2011

I think I need a new camera...or a photography lesson (and a clean mirror).

Spring has finally sprung in Utah (unless another snow storm pops in...eesh), and after slaving away on my gorgeous jacket that I adore beyond any project I have ever done, I decided on something easy as a bridge to my next project (I'm thinking another jacket... a black one). I got out my old pencil skirt pattern and adapted it to a simple A-line skirt. I love the print on the cotton fabric... almost Moroccan. It only took me a bout six hours total to make! I love these easy in-between projects. They help inspire for the next one and give me a break from the last.


Thursday, April 14, 2011

I won't think about that now. I'll think about it tomorrow.

I wanted to wait to blog until Steve came home today so I could get some decent photos of my jacket to show all of you!!! It came out super well and I think it is pretty darn amazing and sexy for my first pattern making experiment in a jacket! The cut is perfect for me, and I'm glad I went with rounded edges on the front-- more flattering on me than just normal straight edges> I can see why so many people love doing outerwear for these reasons: 

1. It takes a lot of tailoring for outerwear, but it's not tailoring a dress. Looser clothing like jackets and coats are always easier to tailor to someone's body than a dress or shirt.

2. There are a lot of fun techniques that go into outerwear, like shaping the collar, advanced seaming, and a lot of fine hand stitching in the lining, to name a few.

3. Outerwear is very rewarding and creative. I feel like there are so many more design options to outerwear than just sleeves, hem length, etc. Closures, trims, ruffle or no ruffle...the possibilities are endless.


I added some lace trim to the seam line of the collar. I think it adds some good SHAZAM. I originally was planning on a nice ruffle (of course) but Steve said it looked "tacked on" and not really a part of the jacket.

These hook and eye closure were a beast to do, and took me about 5 hours so sew them all in. I was planning on just sewing them on the facing, but it looked messy. So I opened up the lining, made openings in the seam to put the hooks and eyes into, and then hand stitched the openings shut around them.  The top two closures are farther apart than the bottom two closures (my bad), but I knew I would never really use the last closure, so it wasn't a big deal. Nor did I want to keep sewing these suckers in after 5 hours.
I'll be making another jacket very soon. I've caught the jacket bug.

Tuesday, April 12, 2011

Making Mistakes

When I was still in school and taking my favorite sewing classes, I was usually the one in the class that was ahead of everyone else; not because I was any better (hardly), but because I am a fast sewer, and fast sewers usually don't stop and think about what they are doing and ask a million questions a few steps in advance in order to always be prepared for the next 20 steps. I'm sure I annoyed Dr. Burnham to no end on some days, but by the time I graduated she did tell me I was a joy to teach because I was adventurous in my sewing. I was fearless.

Yesterday I was thinking about what I was doing with some trepidation because I had no teacher for answers to my questions. Making my fist jacket pattern will inevitably be only a test run for the next jacket, and the next, and the next. There are definitely a few kinks to work out. But that is just what sewing clothing is-- it's all an experiment for the next project. Designers don't have just ONE end-all-be-all collection-- sewing and design is a living, growing creature of mistakes, triumphs, and overall learning. Sometimes I get really frustrated with the fact that I'll never really be finished. Sometimes it excites me. It has been a hard pill to swallow for sure. 

I'd like to point out today a few mistakes I made so far on my jacket so I know what to do for next time:


My collar turned out kind of weird. I messed up where the collar should end and the seam allowance on Center Front should begin. I'll be fixing this for next time, for sure. But right now, it may look kind of cool- i'm still deciding. 


I chose this lining for my jacket solely because of the print, and wasn't really thinking about how see-through it is. Now when I take off my jacket, the world will be able to see all the clipped seams and interfacing! Wonderful! Lesson learned: don't use chiffon for jacket lining. It's just weird (but houndstooth and leopard = genius).

Monday, April 11, 2011

I hope this sunshine lasts.

my jacket is really coming along! After I finished fitting the Muslin mock-up and figured out the collar, I cut it out with the fashion fabric, a jacquard weave leopard print. The fabric is very voluminous in the way it behaves-- I really have to press it well to get a good seam and shape. The collar looks great as well, and I'm happy with the design I chose (for the most part-- I think I'm going to make the front hem have more rounded corners). I interfaced the back, hem and front pieces with regular fusible interfacing. I want this to be a light jacket, so fusible tricot interfacing will definitely suffice for this project. Next, I have to make the facing and lining patterns. 

You should always interface the upper back of jackets. It's just better quality and helps the jacket last longer and keep it's shape.


Friday, April 8, 2011

Big Day


I can't believe it. I really can't. I never thought until yesterday that I could make a jacket pattern myself. But I did! I've read that chapter in my pattern-making textbook multiple times, and I never really understood how simple it really was adopting a bodice pattern to a jacket pattern-- but it is! I am a jacket pattern virgin no more! It really is all about adding some width to the side seams, lowering the arm-scye, and opening the neck line up a bit. After that, it's all about design choices. 

Pictured above is the muslin mock-up I made of the jacket I am planning. It fits really good, but I am still deciding on what to do for the neckline and collar. I know I want a simple standing collar to go down the neck opening and "vanish" once it hits Center Front. My CF opening will be fastened with larger hook and eye closures-- no overlap of any kind. And elbow length sleeves because I hate long sleeves. 

I am really really proud of myself. This is just another step in becoming a great sewer! I feel like after this jacket is done, I'll make a wool coat from my own pattern, and then wedding dress/ evening gown, and then pants. I love this new-found ambition!

Thursday, April 7, 2011

High Style Prairie

This blouse is the best... best fit, best style, love the collar, love the sleeves, love the print. Happy day all the around. If a tornado comes through Salt Lake today (did you hear that wind last night??), I'll be ready with my couture Dorothy blouse.


I love the buttons. They are little black clovers! Found them at Joanne's.

Wednesday, April 6, 2011

Gingham Heaven

I sewed my petal sleeves onto my blouse yesterday, and they are perrrrfffeecccttt. I love them. I've defined them in my head as a "modified cap sleeve", in that they give the coverage of a full sleeve but look more like a cap sleeve. Perfect perfect perfect. I also sewed on the collar and I decided to do just a plain mandarin standing collar instead of ruffles. I thought the print and the sleeve details would be enough for this blouse (oh, and the gold buttons I'm going to use).


darn blogger won't turn my photo the right way!

Tuesday, April 5, 2011

I'm sorry, but I like my blouse! and the puffy sleeves!!!


It was hard getting a good shot of this blouse using a mirror, but I hope it comes across. I love my blouse. I think the sleeves are very different and haute couture. Plus the blouse fits the girls like a glove, so no complaining there. Good blouse all around.

Monday, April 4, 2011

Matching Plaid Hell

Last Friday I went to Joanne's to scope out some cheap but fun fabric to make yet another blouse before I start on my suit jacket, and I happened across this great cotton black and white 1" gingham that is thicker than usual cotton material for shirts and with more structure, which I love and gravitate toward all the time. It reminds me of something out out Kate Spade, who happens to be one of my favorite designers, so I got my 40% coupon out and bought as much as I could-- only 1 3/8 yards were left on the bolt. I was hoping it would be enough to make a blouse with short sleeves, and it was! That was until I made up on sleeve (normal, everyday flat sleeve) and hated it. I'm going to scope out the rest of the Slat Lake City Joanne's to find more of this gingham today so I can possibly make some great petal sleeves, which you all haven't seen in awhile now... Don't know what I am going to do for the collar yet. 

Matching plaids, gingham's, or stripes is necessary for a good-looking article of clothing, but is a pain in the butt to do. Before you even cut out, the lines and squares have to match up to cute out two even and balanced pieces at one time. I like to pin through both layers of fabric so that all the lines match up and don't shift as I pin on the pattern pieces.


Now to cut out pieces so that the seams will continue the straight line print of the fabric, it is best to lay out pieces that will be sewn together next to one another, with the notches matching. This is especially important for princess pattern pieces-- you want those notches at the chest to line up so that the princess seam does not interfere with the print.

I started to sew the Center Back seam of my blouse to make sure that the seam was on grain and following the print. The first time around I got this (no bueno):


The print is only slightly off, but those little details make a big difference in the finished product, especially when it is on a straight seam like Center Back or Center Front.


The hardest part about matching stripes or plaids is working with the curved seams. No these seams aren't perfect on the back of my blouse, but it is pretty good with curvature. The print is hardly interrupted, and the fact that the CB is so good, the interruption is less noticeable for the other seams. For the first real plaid I've ever worked with, I'm pretty proud of myself. 

I think petal sleeves is going to look great on this blouse, and I hope more people like it than my puffy-sleeved blouse :/

Friday, April 1, 2011

beyond sweatpants. And an un-made bed.

I have one sleeve left to do on my blouse! I ran out of fabric from all my different mock-ups of this blouse since I was dumb and didn't use Muslin first, so I had to run by Yellow Bird Fabrics yesterday to get more for the last sleeve. I adopted the sleeve from my snake dress, which is also where I adopted the rest of the shirt from, but made them shorter. Are the sleeves to puffy? I can't tell really. When I look down on the one sleeve as I turn my head to the right, it looks really poofy from my angle, like pioneer poofy. But from the front, I can't tell. It's not like I'll re-do this shirt if they are (hell's-bells no), but I will fix it for the next blouse (and yes, there will be a next blouse!)

Sewing on the buttons was just as bad as sewing the buttonholes. I kept having to re-do five at a time because I was making the front all skee-wampus and not line up correctly with my ill-placed buttons. I did get it right, after about 3 hours.