I learned a lot making my evening gown this semester about fit and draping, but a few of the things I learned were so simple, yet so monumental and necessary for my future work. I've been sewing french seams since I learned to sew 4 years ago, but it never really clicked for me how to make them absolutely perfect, and sewing them in silk chiffon is a whole other adventure.
For the skirt of my gown, the seams are obviously very long, and when sewing such long seams in silk chiffon, it is very easy sew in ease, which makes the seams bubbly and not cute. Eugene had some very cool techniques for sewing french seams.
To start with, the two pieces that were ready to be sewn were first pinned to the wall and then pinned together so that with the help of gravity, no ease was pinned into the seam.
Now, for one of the BEST THINGS I learned this semester at SLCC from Eugene:
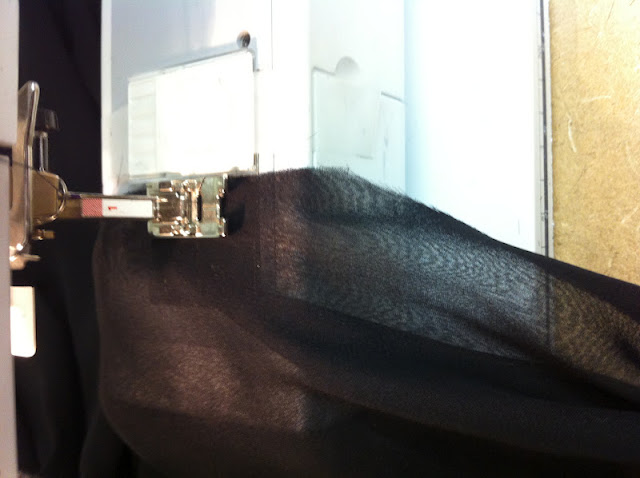
To sew such lightweight and slippery fabrics like silk chiffon, it is hard to keep the fabrics pinned together like they should be, with matched up raw edges, especially when you are only sewing a 1/4" seam for french seams.
To conquer that frustration, lower the machine foot and tape a pack of sewing machine needles right next to that foot (don't tape it to the foot, just to the machine). This pack of needles creates a perfect guide for not only your seamline, but it keeps the chiffon from slipping by pushing it towards the needle. It is amazing how well this trick works-- honestly, one of the coolest things I've ever learned.
AND if you don't want a 1/4" seam, you can either move your needle to the desired width, or tape the pack of needles farther from the foot.
Eugene then had me trim the 1/4" seam allowances to about 1/8", and then I pressed the seam open, which can be hard to do, but when the fabric has to be flipped so that wrong sides are together and the new seam has to be sewn, it is ten billion times easier to have the 1st seam pressed open.
The next trick I learned was how to sew rolled hems. Oh rolled hems, how you have tormented me in the past. Can I get a wha-WHA from everyone who has tried to force yourself to faint trying to sew a damn rolled hem?! I even went out and bought a rolled hem foot for my Bernina and that only really works if I sew on the straight grain, which is like 10% of my sewing. And what hem is on the straight grain??? Answer: none... i think.
The way that Eugene taught us, however, is genius. Sew a folded edge of 1/8" the entire hem using a blind hem foot. The bar on the blind hem foot acts a lot like the taped pack of sewing needles: a buffer that pushes the fabric onto itself. The blind hem foot also keeps the fabric folded with very little effort on my part, which is refreshing :)
Now, the silk charmeuse was very slippery and hard to sew, and my first fold of my rolled hem was a little wide, so I did have to go around the hem and VERY CAREFULLY trim some of that fold excess away. For beginners, it may be easier to just fold over like an 1/2" or 1" and then trim down to the very stitches.
Then, I just went around the hem again the same way I had done the first
time, folding over the edge and sewing it using my blind hem foot. Yes,
this technique does take A TON of thread, especially for a hem on an
A-line evening gown, but is so much easier and takes less time than
using a stupid rolled hem foot.
From the outside, it looks like a perfect rolled hem, without the cursing and the fainting.
part 1: the inspiration
part 2: the muslin
part 3: the silk
part 4: the draping


I found this post super duper helpful! thanks for sharing - ive been out of school for a while and its nice to get the tips from someone who is in the thick of it :)
ReplyDeletecat
www.catgotdressed.blogspot.com
Umm it's been three months and I want to know how this ended up looking!
ReplyDeleteOk one more month with no update! Hope all is well
ReplyDeleteWow! thank you for sharing your great hints! Just in the nick of time! On to prom dress number two, a chiffon extravaganza for my daughter.
ReplyDeleteThis post will save me from unpicking my eyes out next semester!I'm making two evening-wear dresses and I want to improve upon my construction skills since the last evening-wear dress I made was for a friend going to her prom/matric dance (as we call it here in South Africa).She and everyone else was happy and chuffed about it but I believe it could've been better,although she looked stunning.There's always room for improvement and your posts are helping me a great deal.Thanks!
ReplyDeleteamazing site.. good post,I am glad to visit your website.. This article gives the light in which we can observe the reality and it is very useful one and gives in depth information.An interesting discussion is definitely worth comment. I think that you ought to write more about this subject matter, it may not be a taboo subject but usually people do not speak about such issues. To the next! Kind regards!! Thanks for posting.. carry on..
ReplyDeleteThank you for the valuable insights!"
ReplyDelete